
Log in
Go to: https://domain.org/subfolder/wp-admin → enter your username and password.
(If you’re not logged in, WordPress sends you to the login screen automatically.)
Go to the Customizer
From the left-hand menu: Appearance → Customize.
This is where all visual changes happen in Twenty Ten + Twentig.

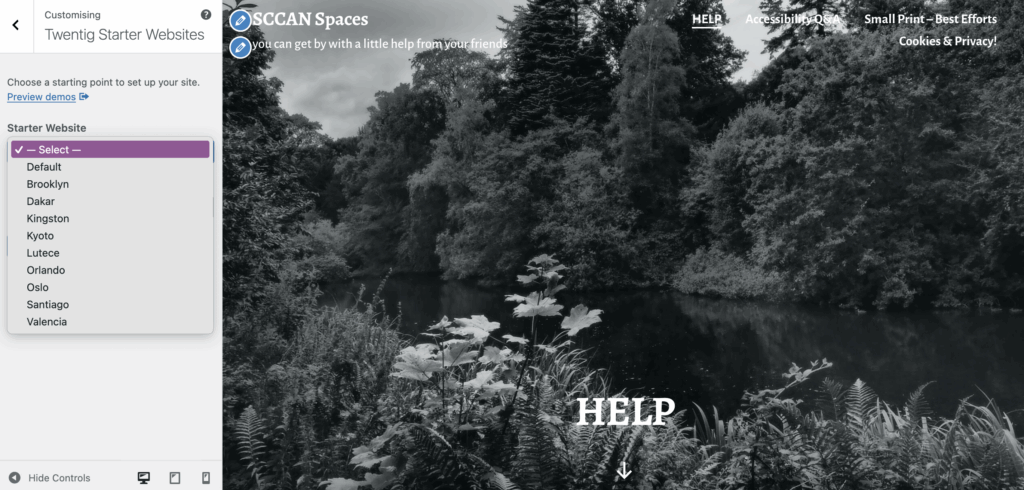
Switch a Design Style (Twentig presets)
Inside the Customizer, open Twentig Options / Design Styles.
Pick from the available presets (about 9) but do not import the content unless you’re happy to delete the clutter.
Click Publish only when you’re happy.
Change Site Identity
Site Title, Tagline, Site Icon (favicon) → Appearance → Customize → Site Identity.
Edit Header Image / Header Layout
Appearance → Customize → Header (Twenty Ten’s built-in options).
Upload your own header image or remove it entirely for a cleaner look.
Colours & Typography (Twentig)
Appearance → Customize → Colours or Typography.
Twentig exposes extra font and spacing controls.
Menus
Appearance → Customize → Menus.
Add/remove items, reorder, create dropdowns.
Widgets
Appearance → Customize → Widgets.
Control sidebars and footers.
(Twenty Ten has a sidebar-heavy structure; Twentig adds layout tweaks.)
Homepage Settings
Appearance → Customize → Homepage Settings.
Choose:
- latest posts
- a specific static page (common for simple or static brochure sites)
Extra Layout Controls (Twentig)
These override some of Twenty Ten’s more rigid defaults.
Preview Before Publishing
The right-hand preview updates live. Save change for later too.
Nothing changes for visitors until you press “Publish”.
Exit Customizer
Click the back arrow until you see Close.
Changes are saved only if you’ve pressed Publish.